Showing posts with label side dish. Show all posts
Showing posts with label side dish. Show all posts
Friday, February 19, 2010
Thursday, January 14, 2010
Kim's Whole Grain GF, DF Bread ~ Simplified Version
I have been making my whole grain gluten and dairy free bread for a couple of years now. Last June I finally posted my recipe with detailed instructions. That recipe is far and away my most visited post. That makes me happy! The hardest part of being gluten free is trying to stomach gluten free rice based "bread". I still make this once or twice a week. But as time has gone by I have started making some changes. The recipe is still basically the same but I have started making it a bit simpler with fewer ingredients. The result is the same. I still end up with the best tasting bread I have ever had. I just made some this morning and for lunch had a slice of it, still warm, dipped in olive oil with minced fresh rosemary, kosher salt and fresh ground pepper. Bliss! Anyway, here is what I am doing now.
Kim's GF DF Whole Grain Bread ~ Simplified Version
1 1/3 cup water warmed to just beyond body temperature
1/4 cup canola oil
1/4 cup honey
3 lightly beaten eggs
1 1/2 tsp salt
1 cup teff flour - ivory or dark (May also use brown rice flour)
1 cup sorghum flour (May also use 1 cup of millet, buckwheat, quinoa, amaranth)
1 cup potato starch
1 slightly heaping T xanthan gum
2 1/4 tsp - 1 T dry active yeast (Start with smallest amount and if you didn't get the rise you wanted try more next time)
1 T sesame seeds
1 T flax seeds
The directions are the same as in my original recipe. I don't always take the time to sift but you get a better blended loaf if you do. I also add a few more flax seeds and sesame seeds to the top of the batter after I pull the paddle out of the bread maker just to make it prettier. (I am also told that this can be done with egg replacer if you are allergic to eggs.) Try this. Eat and be happy!
Saturday, January 9, 2010
Lentil and Cauliflower Salad
I just whipped this up for lunch. Had my camera been working I still wouldn't have been able to pry it away from my girls to take a picture. Sorry. This was fast and easy to make and very satisfying. I was stunned when both of my girls devoured it. Yes, even the three year old who hates all vegetables.
1/2 cup brown lentils
1 cup raw cauliflower chopped into tiny florets
1/2 cup olive oil
1/4 cup rice vinegar
1 large clove garlic
small pinch of cumin
few drops of agave or honey (maybe 1/4 tsp)
salt and pepper to taste
Bring water to boil add salt and then add lentils. Cook until they are tender but not mushy. While those are cooking prepare the cauliflower and put into medium sized salad bowl. For the dressing: Using a blender or small food processor add garlic, vinegar salt and pepper, blend until smooth. Add cumin and olive oil. Blend until you have a creamy emulsion. Taste for salt and pepper and add a tiny bit of honey or agave. This is just to cut the tang of the vinegar, not to make it sweet. I like to use rice vinegar for salad dressings since it is a bit milder than white vinegar. When lentils are done to your liking drain and give a quick rinse. Add lentils to cauliflower and toss with desired amount of dressing. Serve immediately. I make this salad fairly often. I use this same dressing and lentils and sub veggies. I love this with finely sliced green cabbage or lots of fresh coarsely chopped parsley, celery or broccoli.
Friday, December 11, 2009
Teff Polenta with Grilled Veggies

A while back we discovered teff. Not familiar with teff? You're not alone. When doing a spell check the word isn't even in the spell check dictionary. Here is some info on teff. We read about it's nutritional benefits and we were sold. Without discussing it with me, Ron ordered 25 pounds of the ivory teff flour and 25 pounds of teff seed. He has such faith in me that I would be able to figure out what the heck to do with it all. I just finished my 25 pounds of flour last week. It lasted about 7 or 8 months. I use it in place of brown rice flour in many cases and it is the base of my bread recipe. The seed, well that is another story. We use it in our 9 grain cereal and I have used it to make cornless cornbread (which was awesome and I will post soon) but beyond that I am not sure what to do with it. For lunch today I was craving something light and yet hearty. I was determined to use some of that teff seed. I whipped up something that reminded me of corn polenta but only much, much better. Have you ever had one of those meals that just makes you feel happy? One that makes you feel satisfied, not guilty, not craving, not bloated and just plain...well... happy? Well that is how this dish made me feel. I was able to get Sage (5) to try it and she liked it and came back for more. I couldn't get Rori (3) or Justus (18 months) to even try it. Oh well at least one of them tried and liked it. I loved it. I served it with grilled veggies. I sliced the veggies and grilled them outside, dry, with nothing on them. Once they were done to my liking I drizzled olive oil and a bit of kosher salt on them. They too were fantastic!
Teff Polenta
1-2 T olive oil
3-4 cloves of minced garlic
1 can diced tomatoes
1/2 cup teff seed
3 T minced fresh basil
1 1/2 cup water
salt and pepper to taste
Warm olive oil in medium skillet. Add minced garlic. Cook on medium heat for a minute. Add tomatoes, teff seed, basil, water, salt and pepper. Stir and cook covered for about 15 minutes on medium low. Remove lid, turn off heat and stir. Let it sit for about 10 minutes and as it does it will thicken more. Serve with a drizzle of olive oil on top.
Monday, November 30, 2009
Flax Bread
Here is one to put in the regular rotation. Super high in fiber and omega 3 and 6. It is grain free, sugar free, dairy free and obviously gluten free. I made this last week. I can take no credit for it but I wanted to post it with the changes that I made so that I could repeat it - often! This one comes from Elana's Pantry. Here is the original recipe. Here is what I did.
Flax Bread
1 cups flax meal
1 teaspoons baking soda
1/4 teaspoon xanthan gum
1/2 t salt
1 T agave nectar
3 small eggs, whisked
1/4 cup water
⅓ cup olive oil
Preheat oven to 350. Spray a glass pie plate. Pour in batter and bake for 20 minutes or until a toothpick comes out clean. Let cool slightly and cut into wedges. Great as a side for dinner.
This was awesome with butter and would probably have been great with some jam. I had to restrain myself from eating the whole pan. (with that much fiber, that would not have been pretty.)
Tuesday, August 4, 2009
GF, Grain Free, Doughnut - Muffins
I am on several Celiac message boards where people exchange all sorts of information about CD. A subject that has come up several times is fiber. Apparently a common complaint among people with CD is that they just can't seem to get enough fiber in their diet. I can't say that I understand that. I think others must eat a lot of processed prepackaged premade food. Of course the complaint that always accompanies the fiber complaint is that GF foods cost more. I don't get that either. Ron and I were talking the other day and we were trying to figure out if there are any items that cost us more now that we eat GF. We could only come up with one thing that costs more. Pasta. We like one particular brand - Tinkinyada and it is the most expensive (but it is worth it). Other than that we couldn't come up with a single thing that costs us more. We kill these two "birds" with one stone by buying almost no processed foods. We buy a bunch of different flours/whole grains (and then grind into flour) and we buy them in bulk. Yes they are more expensive than wheat but because I make all our bread, muffins, pizza crusts, cookies, cakes etc etc that more than evens out. And thanks to CD we now eat so much better than we ever did before. We routinely eat grains that I had previously had never heard of but are real powerhouses of nutrition. Along with better nutrition comes more fiber. Lack of fiber is NEVER an issue in my house. In this past week I made two different baked items that were grain free, gluten free and sugar free and oh ya super high in fiber. Yesterday I made these "Doughnut - Muffins." They were so good. We ate 12 in less than a day. Even 2 of the 3 kids liked them. Here is the original recipe. I didn't make many changes but I will post what I did change.
Doughnut - Muffins
1 cup flax meal
1 cup almond meal (I processed 1 cup raw almonds in my coffee grinder)
1 T baking powder
1/4 t salt
1 1/4 t nutmeg
1 t cinnamon
4 packets Truvia (stevia)
2 T agave nectar
2 T honey
1/2 cup (1 stick) butter, melted
4 eggs, beaten
1/2 cup water
.
Topping:
1/4 cup sugar
1 t cinnamon
2 T melted butter
Preheat oven to 350 degrees. Line muffin tin.
Mix dry ingredients well (exclude those used for topping). Add beaten eggs, melted butter, water, and sweeteners to the dry mixture. Mix well. Divide batter into 12 muffins. Bake for 20 minutes. Allow to cool slightly. Then (for the kids of course) melt butter in a small bowl. Dip a muffin top into the butter then dip it into the cinnamon sugar bowl. Tastes just like a cinnamon sugar cake doughnut.
Sunday, June 28, 2009
Balsamic Salad Dressing
Since going GF I have become accustomed to reading the label for everything we buy. If you don't have any diet restrictions you maybe haven't done this. It's an eye opener. There are some things that have so much stuff in them that don't seem to resemble food. I try to eat with the thought in mind: "if it's not food then don't eat it." Over time I have noticed that my tastes have changed. One item that always has lots and lots of stuff in it is bottled salad dressing. I can not stand the taste of it now. The vast majority of them have soybean oil in them as a base. I really dislike anything with soy. I think it tastes funky. So I always make my own salad dressings. The variety and possibilities are endless. It is a fraction of the cost of buying it. You can make small amounts so you don't have to worry about it expiring. Then there is the whole thing with buying more things that will eventually cause more trash. Best of all, homemade salad dressings taste way way way better than bought!!! And it only takes a minute to make them. Here is one of my favorites.
Balsamic Salad Dressing
1/2 cup extra virgin olive oil
1/4 cup balsamic vinegar
pinch of salt
pinch of celery seed
2 tsp agave nectar
fresh ground pepper
These are approximate measurements. I never measure when making salad dressings. Just wing it and adjust to your tastes. Mix everything in a mason jar and your good to go!
Wednesday, June 10, 2009
Kim's Gluten Free, Dairy Free, Whole Grain Bread
I think the most common complaint about being on a GF diet is the loss of wheat bread. If you have ever bought a loaf of gf bread you know what I am talking about. It is hideous. It has a funky texture, you can not eat it if it isn't toasted, it falls apart, it has to be kept in the freezer and for all that you pay a fortune. On top of all that, it is nutritionally void. it is usually made of white rice flour and tapioca flour. Metabolically speaking, those are nothing but sugar. And fiber...ugh, none. Wouldn't it be nice to have yummy bread again? Well, here it is. I have been asked several times to post this recipe. It has taken this long because I was going to save it and then figure out a way to market it and then make my millions. ;) Yes, it's that good, in our opinion. But since I will probably never get to that here it is. The directions look like this is really involved. It isn't. I have just added all the little options and possibilities.
I have posted a revised simplified version of this same recipe. There are fewer ingredients and the result is the same. If you want to combine several flours for a varied nutritional profile then use this recipe. If you want speed use the simplified one.


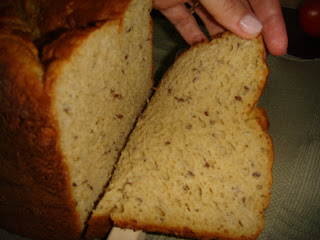
 I baked it for 35 minutes at 350 degrees. Here is what it looked like. I wish you could taste this!!!
 So, yes it can be done and yes it turns out perfectly. A couple other things I did with this loaf (yes, I am forever playing with this recipe) I omitted the apple cider vinegar, I used whole goats milk, subbed potato starch for the corn starch and used just teff and sorghum flours as the base.
I have posted a revised simplified version of this same recipe. There are fewer ingredients and the result is the same. If you want to combine several flours for a varied nutritional profile then use this recipe. If you want speed use the simplified one.
Kim's GF, DF Whole Grain Bread
3 large eggs lightly beaten
1 tsp apple cider vinegar
1/4 cup oil of choice (canola, olive, corn, coconut, grapeseed etc)
1 1/3 cup milk of choice - unsweetened (rice, hemp, almond, cows) warmed to about body temperature
1T +1 t honey
3 T brown sugar
1/2 cup millet,sorghum, quinoa, amaranth or buckwheat (choose one)
1/2 cup second choice of flour - millet, sorghum, quinoa, amaranth or buckwheat (choose one)
1 cup multi grain rice flour, brown rice flour or my favorite teff flour
1/2 cup tapioca flour
1/2 cup corn starch (potato starch works too)
3 t xanthan gum
1 1/2 t salt
2 1/4 t dry active yeast
optional add ins:
flax seeds
sesame seeds
sunflower seeds
add in a total of about a 1/4 cup
Directions:
Combine first 6 ingredients in bread maker pan. Sift next 7 ingredients and then add it on top of liquid ingredients. Toss in your add ins. Make a little well in the dry ingredients and add the yeast in to the hole. Start the bread maker. I do not have a bread maker that has a setting for gluten free bread. So during the initial mixing part I help it out a little. I use a soft spatula and scrape down the sides and help everything get all mixed in. GF bread needs less time as there is no need for additional punch downs like with wheat bread. My machine allows me to program in personal recipes so I use the following settings:
No preheat
Knead 1 = 5 minutes
Knead 2 = 15 minutes
Rise = 60 minutes
Bake 50 minutes
Temp 340 degrees
This makes about a 1.5 lb loaf and I always used to make this bread on the regular bread setting and it turned out fine. I now use my own program just so that I can speed up the process. It takes about 1 hour less my way. One other thing I do is remove the paddle after the mixing is done. I just don't like having the hole left in the middle from it. I just wet my hand, reach in and grab it, then smooth the top down, filling in the hole. Just make sure you grab it before any rising has started.
This recipe is really forgiving. I routinely mix and match the flours. I usually make this without any rice flour as I am not convinced that rice is terribly healthy. Besides, if you use much rice flour then you get the typical texture of gf rice bread which I don't like. Depending on which flours I use it will alter the look and texture as well as taste. We like them all. Often the bread rises really well but by the time it is finished baking and cooling it will fall a bit in the middle which will create an uneven top. We couldn't care less how it looks because it tastes GREAT. My mom eats gluten and she loves this bread. So much so that the last time she came to visit I baked her a loaf to take home. I have been making this for nearly 2 years and although it looks pretty involved it goes pretty quickly. Recently I bought a loaf of gf bread because I wanted to make turkey stuffing and that was just more convenient. It was approximately $6 per loaf! And it tasted like styrofoam to me. I could not eat it. Not even toasted. And this was the only bread that I used to be able to choke down, best of the best so to speak. My bread can actually be eaten as bread instead of toast. (I could never eat the store bought stuff unless it was toasted.) As with all gf baking, it is best on the first day but it is still good after several days. You could slice and freeze to use as needed but we usually eat it all in 2-3 days.
*xanthan gum: if this is your first time baking gluten free bread, you might not be familiar with this ingredient. This is needed for most gf baking. It is what replaces the gluten in wheat bread. It's what holds everything together. When you buy this be warned it is kind of pricey but it is essential and it will last a long long time.
**gf flours are expensive. We have found a way around this to some extent. We will buy 25 pound bags of several whole grains and then grind our own flour. We decided to go this route since CD is a lifelong diet change, the grinder etc will pay for itself over the years. We either get the grains directly from the mills online or we get it from our usual health food store. Given a little notice the local store can order it for us and then we get a discounted price from them. It is also safer to do it this way as there is no possibility of cross contamination from those bins and scoops. We use this online company. On their site they also have some great information on nutritional values of the grains they sell. We also bought our grain mill here. They have several different ones available. Another option for buying gf grains is to go to an asian supermarket. The one we have here is incredible. They have every possible flour. They are also much much cheaper than getting those 1 1/4 lb bags of flour from your grocery store. The only problem is that they are not labelled gf. So if that is important to you then you could try online retailers as well as a health food store or grocery store but you will pay a little (or a lot) more for that certification.
Edited July 20/09: I have had several people contact me asking how to make this bread without a bread maker. Honestly I hadn't tried, until today. I was really winging it with the mixing times, rise times, baking temp and baking time but it turned out perfectly. Like picture perfect. So here is what I did today.
I put the first 6 ingredients in the bowl of my kitchen aid. I mixed on low speed for a few seconds just until it was all mixed. Then I added everything else with the exception of the flax seeds, sesame seeds, sunflower seeds and yeast. I mixed that for 2 minutes on medium speed. I added the remaining ingredients and mixed for another 2 minutes while occasionally scraped down the sides. I sprayed a glass bread pan and let it rise in my oven with the oven off but the oven light on. (Although here in Arizona simply leaving it on the counter is sufficient.)I let it rise for 40 minutes. I took it out of the oven and preheated the oven while it continued to rise.
I baked it for 35 minutes at 350 degrees. Here is what it looked like. I wish you could taste this!!!So, yes it can be done and yes it turns out perfectly. A couple other things I did with this loaf (yes, I am forever playing with this recipe) I omitted the apple cider vinegar, I used whole goats milk, subbed potato starch for the corn starch and used just teff and sorghum flours as the base.Monday, April 20, 2009
Amazing, Chewy, Gluten Free Cheese Buns

Okay, call me a hypocrite. Last week after Justus weaned himself I found myself not breastfeeding or pregnant for the first time in 5+ years. It makes me kinda sad that that part of my life is over but there are some perks. It occurred to me a couple days after he weaned that I could now try dairy again. After that thought struck in the morning the entire day all I could think of was all the things I could have again. By 4pm I couldn't stand it anymore and declared that I was going shopping. I *may* have gone a teensy bit overboard. If it had dairy in it, I bought it. I came back with about 40 lbs of cheese, cream, butter, milk, ice cream, sour cream etc etc. The following day I made the most amazing lasagna ever. (I got that in the oven and then realized that I was going to have nothing to give Justus so I then made a gluten and dairy free lasagna for him. It ROCKED! I will try to post that recipe soon too) I still feel guilt over eating this. I am hoping to get this out of my system and go back to at least mostly dairy free. Dairy doesn't like me either. I get gut aches, bloating and my ears get all plugged up but these are all things that I can ignore until I can try all the things I couldn't in the previous years. I have to get this done and quick. My 20 year high school reunion is this July. While I am not trying to lose 20 pounds before then I really don't want to gain 20 pounds before then either. If I continue to eat like this I will be too embarrassed to go.
First thing this morning the idea of these cheese buns popped into my head. I had seen a food network show more than a year ago and I wanted to try it so bad but it has a ton of cheese in it. I found the recipe this morning and made my own version. The original was from "Simply Delicioso" and she called them Yucca Buns. Here is what I did.
Cheese Buns
1 cup tapioca flour
1/2 tsp salt
1 tsp baking powder
pinch garlic powder
2 egg yolks
2 cups of grated mozzarella cheese
half and half
Preheat oven to 350. Line cookie sheet with foil and spray with nonstick cooking spray and set aside. In a large bowl mix the first 4 ingredients. Then add the egg yolks and cheese. Using your hands, mix it well. At first it will be like flour coated cheese. Then add half and half 1 TBSP at a time while continuing to mix with your hands. When the dough is well blended, uniform and able to stick together, roll into eight balls. Bake for 15 minutes until very lightly golden. Don't brown them. Browning will change the flavor. Let cool for as long as you can stand to and eat warm.
I have to confess that although these are certainly not low fat I ate them with butter. Lots of butter and a little orange marmalade. They were so moist and chewy like a cheese bun should be. There is no way a wheat bun could be this good!
Sunday, August 3, 2008
Honey'd Squash
Okay, I really shouldn't be writing right now. I have been laid up with a migraine for 2 days so the house looks like it has been ransacked by child burglers. In my defense though the laundry is going, I have done 2 days worth of dishes already and dinner is in the crockpot. I am just so excited though I had to share this. We have lots of yellow squash from our garden. Ron planted it. I wouldn't have. It is not a favorite of mine and I really don't use it much. However, I am determined to use it all up. When we were camping and saw that elk it reminded me that I have a couple packages of ground elk in the freezer. I told Sage about it and she wanted to try it. Go figure. She sees the beautiful animal and wants to eat it. Neither of them will eat anything that has ground beef in it but today they both ate elk burgers. I seasoned them simply with salt, pepper and garlic powder and then fried them in some olive oil. They were really pretty good. The best part though was the squash that I served with it.
Honey'd Squash
2-3 cups yellow squash cut up into bite sized peices
2-3 T olive oil (actually I used the same pan as the burgers - hey I never claimed to be low fat mommy!)
Salt and Pepper to taste
1 T honey
Saute up until browned and tender. Then add 1 T honey and saute for another minute. Serve hot.
This is so good it will be my new favorite way to have squash. Sage even ate some which is a shocker. Rori? Well, I will need a miracle to get her to eat any veggie. Seriously, you have got to try this. I wish I had taken a picture to post but it was so good I ate most of it while it was still so hot it was scalding my mouth.
Subscribe to:
Posts (Atom)
